Content
Once you’ve uploaded images for your new article, either click “Content Editor” from the dashboard, or click the Content Editor tab in the lower left corner.

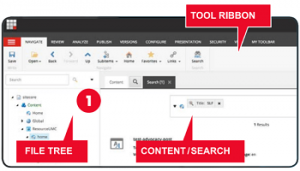
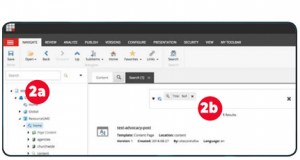
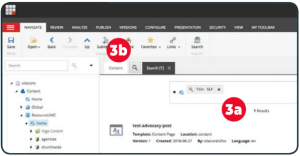
1. Site files are displayed in a tall, narrow frame (the File Tree) on the left of the Content Editor. Users can explore the contents of the site and restrict searches to selected folders (2b). Here, related articles, images and other assets will display based on functional organization. To create a new article (also called an “item” within Sitecore) expand the File Tree to: “Content / ResourceUMC / home / content”
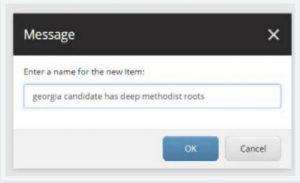
2a. Right Click on “ResourceUMC/home/content” in the File Tree and select “Insert” and choose “Content Page”. Name your content and click “OK.”
Important: Make sure to select “/content” under the “/home” folder, and not “/Content” in the “/ResourceUMC” folder.
NOTE: The name should be in all lower case, no punctuation. This is not the title that will be displayed on the page itself. HOWEVER, it should reflect the actual name of the article. No shorthand or abbreviations. This will assist in finding the story later, and is SEO best practices. If you are migrating a story from Expression Engine, the name must be identical to the url title of the EE story.
For example , if you are rebuilding: http://www.umc.org/news-and-media/storm-shuts-down-united-methodist-schools-in-sierra-leone1 You MUST name the story: storm-shuts-down-united-methodist-schools-in-sierra-leone1
NOTE – URL title: This is the name given to the article in the previous step. To rename it, click on it and give it a new URL. Do not change the URL once a story has been published if at all possible. This will break any external links to the article. Internal links should be adjusted automatically.
3b. Click the Content tababove the “Content / Search” area on the right side of this page. The various editable fields will appear. Make changes as necessary.
NOTE: Before a new article is published, a few “workflow“ steps must be followed:
1. Click “SAVE” in the upper left corner of the “Ribbon.”
2. Under “REVIEW” tab…
- Check-in – Places a new, saved file into “version control” repository.
- Important Submit – Prompts publisher to approve and publish
NOTE: Step 2 is only necessary for previously unpublished content.
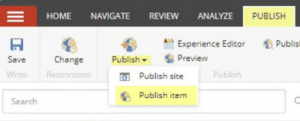
3. Return to “PUBLISH” and choose “Publish Item” from the Publish dropdown options.
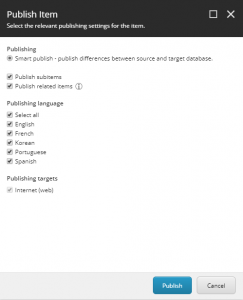
Ensure all options and languages are selected, and confirm your publish (Image 2).
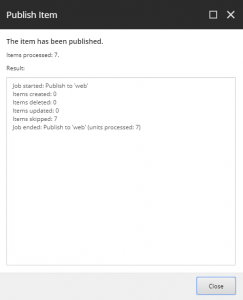
4. Once the publishing process has completed, you will see a pop-up similar to Image 3; your content has been published.
Content Components
Next, you’ll be able to populate various fields for the content. Required data fields are indicated by “*”
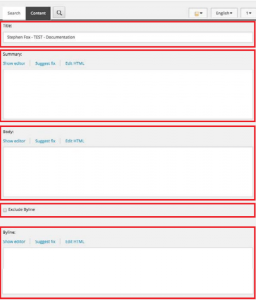
* Title – This is the name of the article as it will be displayed across the site.
Summary – This is a brief summary that will be displayed where the article is referenced elsewhere in the site. Also the default SEO meta description.
* Body – Article content. Use “Show Editor” to edit your article content, add formatting are necessary
Exclude Byline – Remove/Hide byline option on article attribution
Byline– Byline attribution
- This byline will not display if “Exclude Byline” is checked
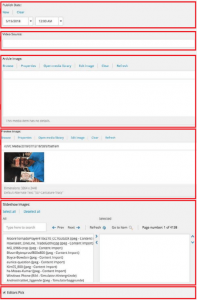
*Publish Date– Here, articles can be set to publish in the future, or alterthe publish date to move items up and down within the chronologically
Video ID – A unique video identifier available via various video platforms. On YouTube, this ID can be located after “?v=” in the url. The video ID is highlighted in the example url below https://ww.youtube.com/watch?v=uBYzYji4rmE”
Article Image– Select an image to be displayed at the top of the article. This is also the default “Preview Image” unless a specific Preview Image is chosen.
Preview Image– If the hero contains a video or a slideshow (or if you wish to override the Article Image), select an image here for display elsewhere on the site.
Slideshow Images – Create a slideshow by searching for and selecting desired photography
- Search functionality is reliant on image title; Due to this, it is advisable to create a list of files from Asset Bank before assembling a slideshow.
- Slideshows should not exceed 12 images
Editor’s Picks – Check this box to add this article to the various “Editors’ Picks” areas throughout the site.
Subtitle – Not Currently Available
Dynamic Flag – Add “FEATURED” or other special indicators to the large, main article on the home page; While this field supports any short text, it is advisable to limit Dynamic Flags to a few recurring indicators (Featured, for example).
Dynamic Flag Start/End Date – Begin displaying Dynamic Flag on “Start” date and remove Flag on “End” date. This flag can say anything entered in the “Dynamic Flag” field.
Page Metadata – SEO metadata fields including keywords, page title and description.
* Categories– Appropriate category or categories. When selecting a child category, the parent must be selected as well. The topmost category in the selected field will be displayed when the article is referenced across the site.
* Author – A field for selecting the content author.
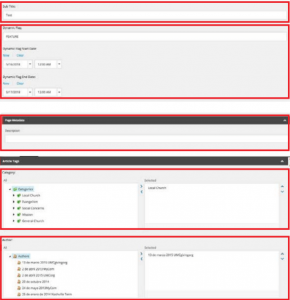
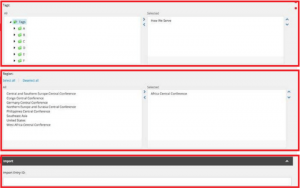
* Tags– Add specific tags, which allow articles to display within taxonomy-specific fields. Good for identifying *where* a story took place.
Regions – Display content based on regional interest (not necessarily story location)
Import ID – Not Currently Available